6 min to read
JS Links
This post will give an overview of JSLinks. JSLinks provide the ability to override the Client-Side Rendering (CSR) templates for SharePoint list fields, forms and views. To view the raw code, here is a link to the github project.
JSLink References
SharePoint Objects
SharePoint 2013 introduced the JSLink property to many objects. The following is a list of SharePoint object types that have the JSLink property:
- SPContentType
- SPForm
- SPView
- Web Parts
- BaseXsltListWebPart
- ListFormWebPart
- PromotedSitesViewWebPart
- TilesViewWebPart
- SPField
- OutComeChoiceField
- RelatedItemsField
- SPFieldAttachments
- SPFieldBoolean
- SPFieldCalculated
- SPFieldChoice
- SPFieldCurrency
- SPFieldDateTime
- SPFieldDecimal
- SPFieldFile
- SPFieldGeolocation
- SPFieldLookup
- SPFieldMultiChoice
- SPFieldMultiLineText
- SPFieldNumber
- SPFieldText
- SPFieldUrl
- SPFieldUser
- TaxonomyField
URL Wildcards
The JSLink property MUST be a relative url or use a wildcard. For example, “https://sharepoint.com/siteassets/jslinkfile.js” will not be loaded, but “/siteassets/jslinkfile.js” would be loaded. The following wild cards are available:
- ~site - The relative url to the current web.
- ~sitecollection - The relative url of the root web of the current site collection.
- ~layouts - The relative url to the virtual layouts folder.
- ~sitelayouts - The relative url to the layouts folder of the current web.
- ~sitecollectionlayouts - The relative url to the layouts folder of the root web of the current site collection.
Loading Multiple Scripts
The JSLink property uses the ‘|’ as a delimiter for loading multiple script files.
Client-Side Rendering (CSR) Template Overrides
Template Manager
The template manager is used to register overrides and apply customizations to the SharePoint object. The following are a list of properties available to override:
- BaseViewID
- New Form
- Edit Form
- Display Form
- ListTemplateType
- Templates
- OnPreRender
- OnPostRender
Template
The template contains the following properties to override:
- Header
- Footer
- Body
- Item
- Group
- Fields
- NewForm
- EditForm
- DisplayForm
- View
- OnPreRender
- OnPostRender
List Customizations
This section will give an overview of the customizing areas of a SharePoint List. The developer is able to customize the html of the following areas:
- Content Type
- New Form
- Edit Form
- Display Form
- Field
- New Form
- Edit Form
- Display Form
- View
- View
- Header Area
- Footer Area
- Item Area
- Body Area
- Group Area
Content Type
The content type object JSLink property can be used to customize the following areas:
- New Form
- Edit Form
- Display Form
CSR Content Type Template
The CSR template for the list form is:
- View - The function to override the form completely. This requires the List Form webpart(s) “Form Template Name” property to be set to be updated from “ListForm” to “CSRListForm”.
- OnPreRender - The event called before the field is rendered.
- OnPostRender - The event called after the field is rendered.
Field
The field object JSLink property can be used to customize the following areas:
- New Form
- Edit Form
- Display Form
- List View
CSR Field Template
The CSR template for each field is:
- [Field Internal Name]
- NewForm
- EditForm
- DisplayForm
- View
View
The view object JSLink property can be used to customize the following areas:
- Header
- Footer
- Item
- Body
- Group
CSR View Template
The CSR template for the view is:
- Header
- Footer
- Item
- Body
- Group
- OnPreRender
- OnPostRender
gd-sprest NPM Library
The gd-sprest library has been used to register and demonstrate various JSLink customizations. The library has a JSLink template builder to help minimize the amount of code required to write. The library also has helper methods for customizing the field, form and view. Below is the minimal template for registering a CSR override.
Code Template
"use strict";

/**
 * JSLink: [ClassName] Customization
 */
var [ClassName] = (function () {
    /**
     * Methods
     */

    /**
     * Initialization
     */
    function init() {
        // Register the JSLink template(s)
        $REST.Helper.JSLink.register({
                    // Template overrides go here
                });
    }

    /**
     * Public Interface
     */
    return {
        init: init
    };
})();

// Write the javascript to initialize the CSR override. This will ensure it's called when MDS is enabled
document.write("<script type='text/javascript'>(function() { [ClassName].init(); })();</script>");
Example
I created a github project to use as a reference for this post. This project uses the Visual Studio SharePoint Add-In project type.
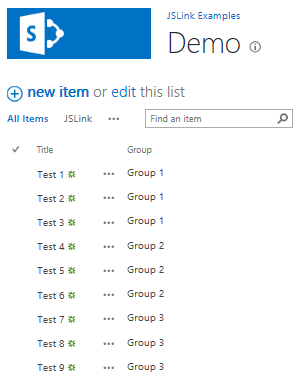
List
The first thing I did was create a demo list called “Demo”. This list has one custom choice field called “Group”. A custom view called “JS Link” was created to demonstrate the various areas to customize.
Apply JSLink
To apply customizations to these objects, I updated the Schema.xml file and added the JSLink property to the following objects:
- Content Type
    <ContentTypes>
      <ContentType ID="0x01CC4335B8F351436FA8D01DCC020F4AF7" JSLink="~site/Scripts/gd-sprest.min.js|~site/Scripts/form.js">
        <FieldRefs>
          <FieldRef ID="{fa564e0f-0c70-4ab9-b863-0177e6ddd247}" Name="Title" />
          <FieldRef ID="{99bff9c3-9d84-4870-adcf-601720461f6d}" Name="GroupType" />
        </FieldRefs>
        <Folder TargetName="Item" />
      </ContentType>
      <ContentTypeRef ID="0x0120" />
    </ContentTypes>
Note - By default the ContentTypeRef is used, but you can use the “Create GUID” tool and change the element from “ContentTypeRef” to “ContentType” and update the “ID” attribute appending the GUID.
- Group Type Field
      <Field ID="{99bff9c3-9d84-4870-adcf-601720461f6d}" Type="Choice"
             Name="GroupType" StaticName="GroupType" DisplayName="Group"
             JSLink="~site/Scripts/gd-sprest.min.js|~site/Scripts/field.js">
        <CHOICES>
          <CHOICE>Group 1</CHOICE>
          <CHOICE>Group 2</CHOICE>
          <CHOICE>Group 3</CHOICE>
        </CHOICES>
      </Field>
- “JS Link” View
      <View BaseViewID="2" Type="HTML" WebPartZoneID="Main" DisplayName="JSLink" MobileView="TRUE" SetupPath="pages\viewpage.aspx" ImageUrl="/_layouts/15/images/generic.png?rev=23" Url="JSLink.aspx">
        <Toolbar Type="Standard" />
        <XslLink Default="TRUE">main.xsl</XslLink>
        <JSLink>clienttemplates.js|~site/Scripts/gd-sprest.min.js|~site/scripts/view.js</JSLink>
        <RowLimit Paged="TRUE">30</RowLimit>
        <ViewFields>
          <FieldRef Name="LinkTitle"></FieldRef>
        </ViewFields>
        <Query>
          <GroupBy>
            <FieldRef Name="GroupType" />
          </GroupBy>
          <OrderBy>
            <FieldRef Name="GroupType" />
            <FieldRef Name="Title" />
          </OrderBy>
        </Query>
        <ParameterBindings>
          <ParameterBinding Name="NoAnnouncements" Location="Resource(wss,noXinviewofY_LIST)" />
          <ParameterBinding Name="NoAnnouncementsHowTo" Location="Resource(wss,noXinviewofY_DEFAULT)" />
        </ParameterBindings>
      </View>
field.js
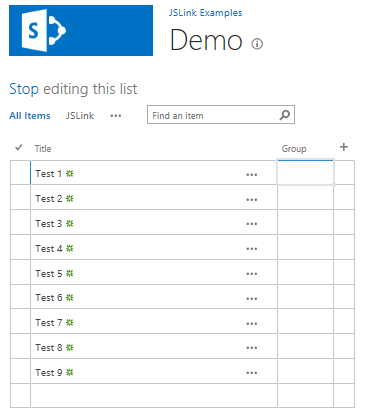
The field script registers an override for the edit form and view. Setting an override at the field level, will ensure it’s applied to ever list view. Below is the code sample for registering this customization.
// Register the JSLink Template
$REST.Helper.JSLink.register({
        Templates: {
                Fields: {
                        GroupType: {
                                EditForm: (ctx, field) => { $REST.Helper.JSLink.hideField(ctx, field, true); },
                                View: $REST.Helper.JSLink.disableQuickEdit
                        }
                }
        }
});
form.js
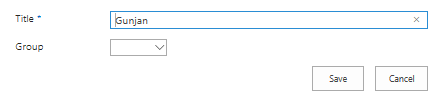
The form script registers an override to the “Title” field in the new form. Below is the code sample for applying a default value to the “Title” field.
    // Method to set the default value
    function setDefaultValue(ctx, field) {
        // Default the value
        ctx.CurrentFieldValue = "Gunjan";

        // Render the field
        return $REST.Helper.JSLink.renderField(ctx, field);
    }

    /**
     * Initialization
     */
    function init() {
        // Register the JSLink template
        $REST.Helper.JSLink.register({
            Templates: {
                Fields: {
                    Title: {
                        NewForm: setDefaultValue

                    }
                }
            }
        });
    }
view.js
The view script registers an override to all the areas it can customize. It will place a color block before and after the default areas. Below is the code sample for applying these overrides.
// Register the JSLink templates
$REST.Helper.JSLink.register({
        BaseViewId: 2,
        Templates: {
                Body: body,
                Footer: footer,
                Group: group,
                Header: header,
                Item: item
        }
});
Demo
The example github project will apply the following customizations:
- Default the “Title” field in the new form
- Disable the ability to edit the field in all views
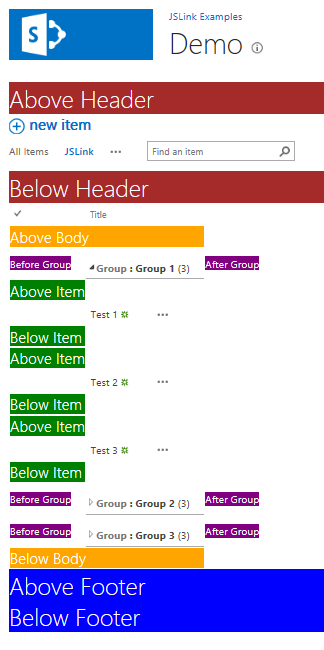
- Highlight the available areas in the “JS Link” list view
Default Field Value
Disable Edit in List View
List View (Read)
List View (Edit)
Highlight List View Customization Areas
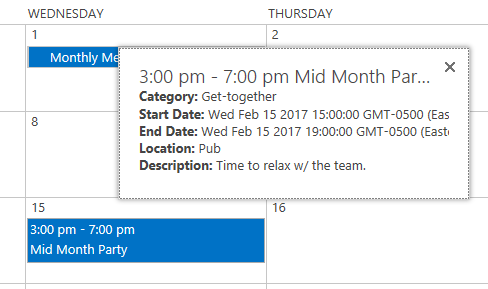
View w/ No Items
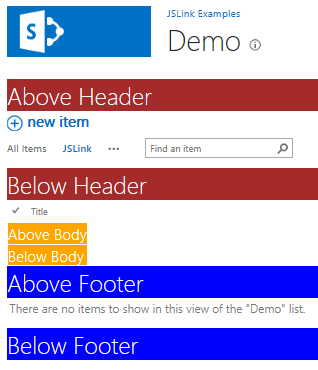
View w/ Items
Conclusion
I hope this post has been helpful for those applying customizations through JSLinks.

Comments